Showing posts with label Furniture. Show all posts

1 February 2013

Winter White Desk Makeover

Happy Friday loves! Inspired by the blanket of snow that we came home to last night, I have a bright and fresh makeover to share today – this sweet little desk!

It wasn’t quite as lovely in its former life – truth be told I walked past this piece at the goodwill for several weeks before finally taking it home. But we used that to our advantage and bargained it down to 30 bucks :)  


And no - that yellowish tinge wasn't created by my camera - this was for reals. The finish was dated, and those pulls just weren’t doing it for me - they might look fab somewhere else but on this piece there were just too many of them. Like little bats flying at you...yikes! But a little love and a bright shade of white revived this desk from tired to timeless!

I wanted the new hardware to add a little interest to the plain drawer fronts but still be inexpensive - since there are so many of them. These great new geometric knobs did the trick - cheap and chic! 

I found the little blue bowl at Winners and I'm ridiculously in love with it. The vase was a $1 thrift store find. Both lovely additions to my growing obsession with blue and white that all started with this lamp.

I started the desk's makeover by prepping the drawers for new knobs: filling up the old holes with wood filler and sanding them smooth. 

I wasn’t digging the original curvaceous legs either, so the honey squared them out with a jigsaw. 


To keep the paint job looking neat I also taped off the drawers and the interior of the desk. 


Then I got to work with the usual suspects: 1-2 coats of Zinsser primer (the desktop got a second coat for extra durability), 2 coats of Behr cottage white (leftover from my hutch project), and 3-4 coats of Varathane sealer, lightly sanding between coats (when I remembered too :) 

Turned out pretty sweet!


19 November 2012

The Tuxedo Dresser - A Black & White Makeover

I’m a little bit smitten with our latest dresser makeover – it’s classic yet a little funky, kind of black tie with a twist, which I totally love :)


We bought this dresser off Craigslist in the summer – I liked the shape and all the pretty little details in the woodwork, although the hubs thought the bottom looked like a giant mustache.


Despite seeing past the technicolour finish, it took me awhile to get started. The honey and I both wanted to use up some leftover paint from previous projects, but I kind of felt like doing something new. Frankly, the thought of using the same old paint left me feeling pretty uninspired...But I rolled with it...Eventually I settled on staining the top dark and painting the body white – I've been loving that country-esque look lately. But after a LOT of prep and several tries the stain just wouldn't take evenly.

So on to plan B, a different two-tone look that's a little less country, a little more chic.


Black and White Tuxedo Dresser

I'm SO crazy about black and white - the colours are so classic but together they look so bold. 


Love how the new paint job highlights the details. Although in black it does look a little more mustachey..


The new knobs are my favourite part. I had bought the same ones with a white center last year on clearance at Homesense, and while working on this dresser I realized they'd be perfect, but I only had 3. I was disappointed I couldn't use them, but then totally lucked out finding these!


I was surprised at how much I ended up liking this piece - despite using the same old paint. All it needed was a little re-imagining.

Black and White Tuxedo Dresser

In terms of the how-to, I prepped the piece by lightly sanding a few rough spots and gave the whole thing a thorough cleaning. I filled the holes from the old pulls with wood filler and sanded smooth. Then I taped off the sides of the drawers and got to work: 1 coat of Zinsser primer, 2-3 coats of paint, and 3 coats of satin Varathane sealer. 


I added a little paint conditioner to help with brush/roller marks, but I've learned it's really about your technique. Thin coats are better than thick, and the hardest part is trying not to work the paint too much by going over it a million times. Especially with the Varathane, use VERY thin coats and work quickly, or you’ll end up with tons of marks (the can says not to use a roller but I did so anyway), not to mention BUBBLES! I ended up adding a little conditioner to the Varathane too - probably not recommended but I found it helped. In the end I achieved an even surface that's also silky smooth to the touch :) Last but not least I measured out the placement for the knobs and drilled new holes. 


For now this pretty little tuxedo dresser is fancying up my dining room, waiting to get sold!


22 October 2012

Sprucing a Guest Room with A DIY Upholstered Headboard

Happy Monday! Hope everyone had a great weekend! We had an amazing time with some family visiting from out of town :) Just before their visit, my honey and I helped my parents spruce up their guest space with a few simple updates and a DIY upholstered headboard!  

 This space in their basement got little attention the last few years, it was mostly home to unused furniture from the rest of the house :) Since most of the budget went to new broadloom and new built-ins (more on that soon!), we couldn't spend a lot on furniture and accessories. So we DIYed the headboard - for about $50 in supplies and less than 2 hours of work - and made a huge impact in the space!   

    
Supplies: 
  • OSB wood board cut to size at the shop
  • fabric 
  • foam mattress pad 
  • quilt batting 
  • staple gun 
  • upholstery tacks (nailheads) and a rubber mallet (optional)
We started by measuring out a size for the headboard. For a queen bed, we went with 62" by 35". We chose an OSB board because it was way cheaper than plywood and easier to staple to, and we had it cut to size at the store.


Rather than buying upholstery foam (which can get pricey!) I used a foam mattress pad. The twin size pad worked perfectly. 

 
First I laid the foam on top of the board and cut it to size - about an inch larger than the board so it could wrap around the sides and create smoother rounded edges.  


Next I laid out the layers of the headboard - fabric, batting, foam, and the board. If your fabric has a right side, make sure it's face down, and if it's patterned you'll also want to line it up. You can also glue your foam to the board - we did this with plain old craft glue since we were working indoors, but I realized afterwards it wasn't necessary. 


With my foam overhang around the board it was harder to staple all 3 layers neatly, so I stapled the foam first. I pulled it around the back of the board and stapled, and trimmed some excess from the corners. Then I just pulled the fabric & batting tight and stapled to the back of board. I started in the middle and worked my way around, one side at a time & saving the corners for last.  


To do the corners, I trimmed away some of the extra fabric & batting that was creating too much bulk. Then I just sort of winged it, stapling as close to the corners as I could and using the little flap that remained to create a small pleat. 

  
Next I added a nailhead trim with upholstery tacks. You can use pre-made strips of nailhead trim like these, but I couldn't find the right colour in stores and was too impatient to order online :) In anycase, nailing them individually didn't take long at all, and I ended up loving the spacing! I kept a measuring tape on hand to make sure my line stayed somewhat level, but for the most part I eyeballed it. I also went back and redid a few. The trim isn't totally straight and the spacing isn't quite even, but you can hardly tell. The hardest part was that the tacks kept bending, but after a bit of practice I got better. The key was to start gently tapping until they inserted into the wood, and then nail harder to get them all the way in.

The last step was adding legs. You could attach your headboard to the wall, but we wanted a less permanent set up. So my sweet husband cut 2 legs from the leftover OSB and attached them to the back of the headboard, measuring the right height and making sure they were level!

Between the 2 of us it hardly took us 2 hours, and the final product makes for an inviting and relaxing guest space :) 

This project was so easy, trust me when I say anyone can do it - I can't wait to do another! It adds a subtle sophistication to the space, plus it's soo comfy. 


We dressed the bed using mostly linens we had on hand, although I added a bed skirt to hide the old metal bed frame. Other little updates to the space include the inexpensive Ikea table lamp, new cushions for the wicker chairs, and full length curtains that help to soften the look of the room.


With a couple updates and an easy DIY headboard, my parents' guest space is totally transformed. Lucky for me my husband I will be the next guests checking in - for Eid next weekend :)

10 October 2012

DIY Brass Etagere – Gold Leafed Ikea Vittsjo Hack!


I think etagere is just a fancy french word for shelf, but it’s so much lovelier to say :) Whatever you want to call them, I’ve been crushing on brass and gold étagères for ages. They’re so stylish and elegant and the perfect way to display a few pretty treasures.

I fantasized about finding a fabulous vintage étagère, though I never bothered searching for a new one – even if I could afford it, I wouldn’t know where to look (where do fancy people who buy these kinds of things even shop?). So when I came across this DIY version by Ana Antunes, I was instantly inspired! And I had the perfect spot for it in my new living room :)

I started with the Vittsjo shelving unit from IKEA. These units come in 2 sizes, for my space I went with the larger one - it's $90 in Canada but only $70 if you're in the US.   

I love the soft and elegant gold Ana painted her Vittsjos, but I had no idea how to recreate it. I tested out some different spray paints and initially went with Krylon’s metallic brass. But after a few weeks living with it I was kind of disappointed. The colour was more yellow than I wanted for this project, and the finish was flat. I decided to try gold leaf instead, and I’m so happy I did - this time around I’m completely in love!


The finish is smooth to the touch, but it still has a really cool distressed look that I love.

Plus it’s more reflective than paint (which was just sort of glossy), giving the étagère a metallic effect.


I love that bit of sparkle that it adds to our living room! Plus after moving into this home we moved our bookshelves upstairs to the study room, so I like the height of this piece in the space too. 


I’m still playing around with the styling of the shelves, but it’s so nice to have a space in our living room to display some of our favourite things. A few special books, sentimental knick knacks, and other accessories that make me happy :)


Eventually I want to change the bottom and top wood shelves into mirror or glass, but for now I left the original ones. The bottom shelf is housing some of our drum collection.


I have to admit, the process was pretty long, and at times a bit discouraging. If you’ve never used gold leaf before like me, think twice before starting on something this big! That said, I did eventually get it done, which also means it’s totally doable with a little time and patience.


To hack your own Vittsjo, here’s what you’ll need:
  • 3-4 books of gold leaf (for this size Vittsjo; they usually come in 25 sheets per book, I found mine at a local art shop for $5 a book, they’re also sold online or at craft stores)
  • size (leafing adhesive)
  • a couple foam brushes
  • a soft artists brush - I used a makeup brush instead
  • sealer (optional)
  • a vacuum (the gold bits will get everywhere :)  
 For any first-time gold leafers like me, here's what I did:


Before you start, think about doing a few practice pieces in inconspicuous areas (like the back legs). I did a few test pieces to make sure I liked the finish of gold leaf since this was my first time using it.  

 
Step 1: apply an even coat of the leafing adhesive (found in my local art shop) with a foam brush, working in small sections. Be careful that it doesn't puddle in the corners! Let it dry until it’s clear and tacky, according to the package, in my case it was about 45 mins.

Step 2: cut the gold leaf books in half - half a leaf was plenty to wrap around the thin sides of the Vittsjo. It’s much easier to cut the sheets in the books, or at least between pieces of the wax paper they come in, than cutting them individually.
 

Step 3: lay a sheet of gold leaf (one sheet at a time). Handling the leaf is a bit tricky - if you even breathe too hard on it it’ll flutter away - but after a bit of practice I got into a good groove. The easiest way I found to handle them was holding the leaves using bits of the wax paper. 

Step 4: gently smooth out & flatten the leaf using the tip of your finger (or a brush, I found using my finger easier, just remember not to use sticky fingers!). As you're smoothing it out, wrap it around the sides of the Vittsjo.


Step 5: burnish the gold leaf (basically rub it) to smooth it out, flake away the excess pieces and also buff it up. I used my fingers in some areas as well as a soft make-up brush, which was good for getting into the corners. You can also use a soft cloth.
 

Repeat steps 1-5 until you've covered the whole Vittsjo. You can even do step 5 all at once after leafing the whole shelf. As you work, you’ll likely have some areas where the leaf didn’t stick, which you can go back and redo with some of the bigger flakes that fell off. Don’t freak out about it, my inner perfectionist had a hard time with this, but it’s almost impossible to get a totally smooth application without any little pieces that you have to fill in. The little imperfections are hardly noticeable once you’re done though, and they add to the distressed/textured effect of the gold leaf. 


I worked on this project a little bit every day for over a week. You might be able to knock it out in a day or two, but I just preferred doing a little at a time. That way it was still fun and it didn't become too tiring or frustrating :)

Step 6: apply a sealer if desired. It won’t really get a lot of wear & tear, but I wanted to make sure the finish was still somewhat durable, and it only took about 10 minutes to do. This particular sealer didn't dull the finish at all. 

The gold leaf was definitely a lot more work than painting, but I’m so happy with how it turned out! I didn't really love my Vittsjo with my original spray paint job, but now I totally do :)


Our new etagere looks great in our living space - reveal of the full room coming soon!

Linking up at the Fall Pinterest Challenge, Furniture Feature Friday, well as the November Before & After Party! ! Be sure to check them out for tons of great projects :)

10 September 2012

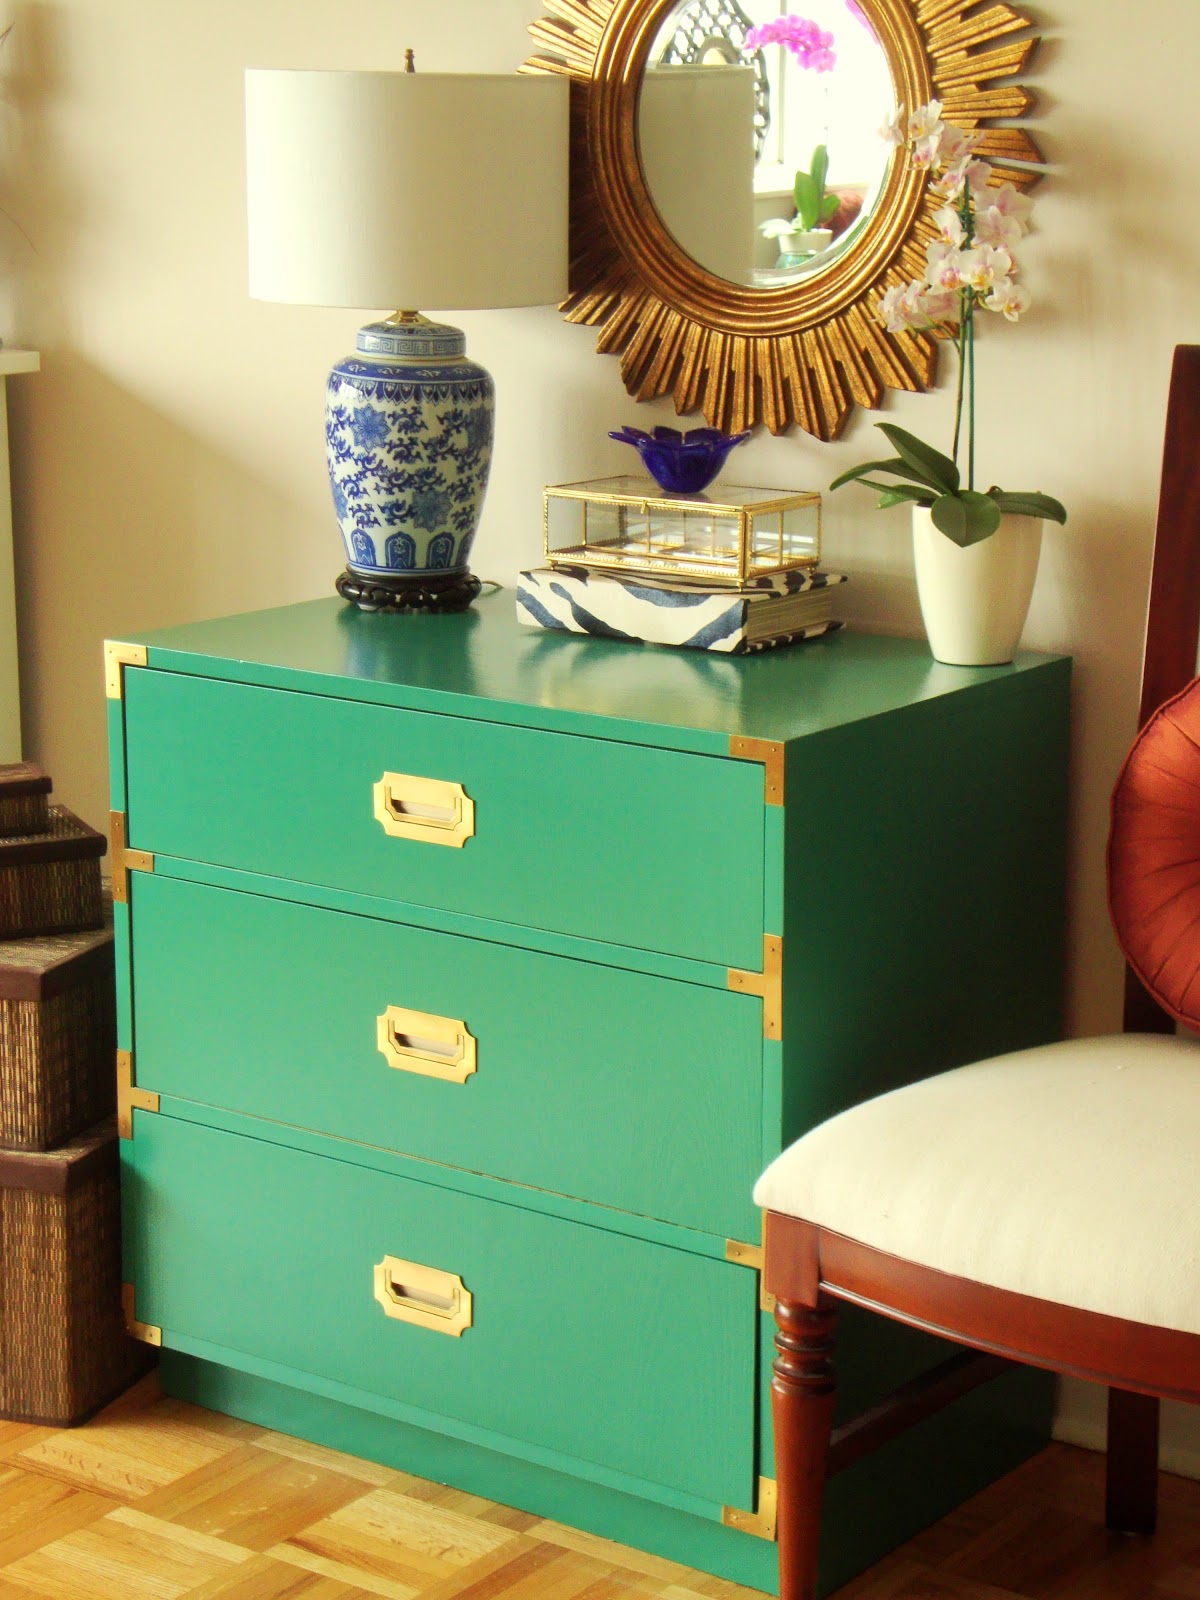
Going Green – Campaign Dresser Makeover! (Plus a Review of Benjamin Moore's Advance Paint)

As much as I love classic blacks and clean whites, my last few makeovers left me seriously craving some colour. So I finally took the plunge with this fabulous little campaign chest – the perfect candidate for a bright & bold transformation! 


I’ve been crushing on campaign furniture for awhile now, what with all the gorgeous makeovers online. So when I found this piece at GW a few months ago, I may have jumped for joy. Just a little bit :) And at $17, it wasn't a bad deal for design inspiration come true.


The finish looks way better here than it was - really drab and dizzingly grainy. I knew I wanted to go bright - how great would this look in a deep red or indigo blue? Not to mention pink, if you’re not married to my husband :) But we both liked the idea of a fun bold green, so I went with it.

For starters we removed the hutch ('we' meaning my sweet husband, with the help of my parents’ awesome handyman friend Hai - I pretended to supervise). This was harder than expected because the screw heads were embedded, so it had to be pried + sawed off, after which we had to deal with the screws sticking out.  There must be a smarter way to do this, but all we could think of was to saw them off.

Since the dresser was in relatively good shape, the rest of the makeover was fairly straightforward.   


1. patched the screw holes with wood filler, plus all the major dings and scratches and one pretty beat up corner
2. primed with Zinsser Cover stain, a stinky but otherwise great sanding-free primer for laminate/glossy surfaces
3. applied 2 coats of semi-gloss paint, sanding lightly between coats

I decided to try out Benjamin Moore’s Advance paint, mixed in a custom colour. Can we just take a minute to talk about this paint?! It is aMAZING – I’d read good reviews, but nothing prepared me for the awesomeness that is this paint. Seriously! It rolls on as smooth as butter, and it has an extended drying time as well as being self-leveling, which meant the finish came out PERFECTLY. No matter what I did, by the time it dried it always leveled out to a super smooth even coat, not a hint of patchiness, let alone a single brush or roller mark. No need for paint conditioner! Plus I hardly used any of it (this dresser used less than ¼ of a quart), and despite the deep colour without a tinted primer, I was good in 2 coats. It's a bit pricier (here in TO, it cost me about $5-10 more than a regular good quality brand from a big box store) but it definitely goes a long way. And for an amateur painter like me it’s worth it for a guaranteed professional finish. Here's a close-up:


On the downside, the extended dry time does mean a much longer cure time between coats, but it was a reasonable trade-off.

As for a sealer, the paint guy claimed it wasn’t needed because this paint dries to a hard and durable finish over time. Not sure about this yet – it has got a few  tiny marks on the top already, but the sealer I tested dulled the finish so I skipped it anyway. Anyone with any tips please let me know :)

I’m really happy with the final results. So much so that I won’t be selling this one – it's the perfect statement piece for our living space.


The colour reads more turquoise on screen than it is in person, but picture a really bright deep green. I still felt a bit hesitant about it at first but now I totally love it -  it's so fun and vibrant and I just love how it makes the hardware pop.


I'm crazy about this Chinese porcelain lamp - it was an amazing Goodwill find for 10 bucks (right?!). I paired it with a simple shade from Homesense.


The lovely orchid was from my Mom :) and the mirror was another Homesense find. Picked up some of the other accessories on a visit to the US awhile back (at Homegoods - any guesses what my fave store is?)


Here's another before and after


I'm sad to say it got a little damaged in the move, but it's still the perfect pop of colour in our new home!