5 December 2012

Moving Again + Our New Place


Yes indeed - our 6 months up north are almost up! The time really flew by, I'm actually sad to be leaving...At first I felt a bit isolated up here, but this little city quickly grew on me and I'll definitely miss it. Still, I'm happy to be moving home! Well, my home anyway...the hubs is from Cape Breton, but we're actually moving to Pickering, which is just east of Toronto - so that's kind of a compromise between Toronto and Cape Breton right :) 

Anyway I'm really excited about the new place! It belongs to my in-laws, who'll be sharing the home with us. We'd actually been house-hunting since May, it took us awhile to find the right place!


The house was a flip so a lot of the finishes are brand new. At first we really wanted a place we could fix up ourselves and customize, but it's also kind of nice to be moving into something bright & fresh without any work needed. Now we can just focus on little cosmetic changes and one or two bigger renos.


I love that the kitchen is clean and new! We'd love to reconfigure the space to make better use of it and add more counterspace, but that's definitely not a priority.


The upper floor has 4 bedrooms (forgot to shoot the 4th) - two with broadloom and 2 with laminate. I actually like the floors but my husband isn't a fan, so that's another someday project.The extra rooms mean we can have our own office spaces (at least for now). That's pretty much music to my ears since the hubs has been completely hogging what used to be our shared desk :)


The bathrooms are all redone which is really nice. All they need are a few accessories to dress them up and add a little personality. We're also planning to add a shower to the lower level for my in-laws.


We're hoping to make the windows in the lower level bigger so it feels less basement-y, but the best thing about this floor is the ceiling height!


The super spacious laundry room is the perfect spot to add another kitchen. That plus the new shower and bigger windows will make a great in-law suite, even potentially a rental unit in the future


For the entry we're considering a new front door with windows to bring more natural light into that area. I'm also thinking about faux wainscoting, maybe even some wallpaper or stenciling...but I'll save all the decorating ideas floating around my head for another post :) For now I better get back to packing!

19 November 2012

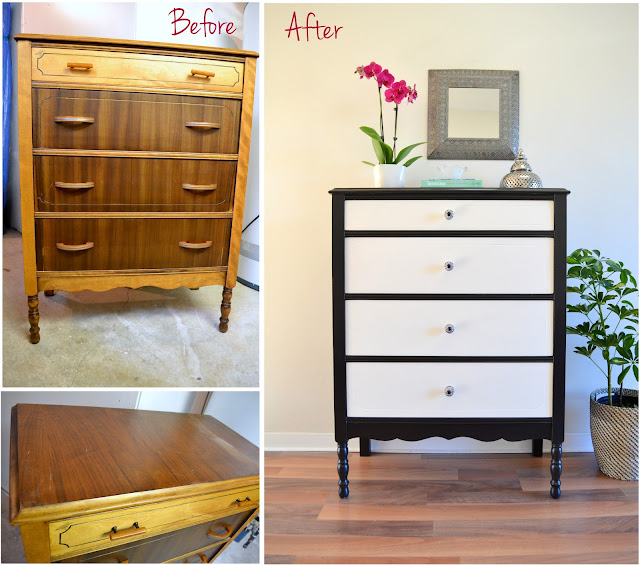
The Tuxedo Dresser - A Black & White Makeover

I’m a little bit smitten with our latest dresser makeover – it’s classic yet a little funky, kind of black tie with a twist, which I totally love :)


We bought this dresser off Craigslist in the summer – I liked the shape and all the pretty little details in the woodwork, although the hubs thought the bottom looked like a giant mustache.


Despite seeing past the technicolour finish, it took me awhile to get started. The honey and I both wanted to use up some leftover paint from previous projects, but I kind of felt like doing something new. Frankly, the thought of using the same old paint left me feeling pretty uninspired...But I rolled with it...Eventually I settled on staining the top dark and painting the body white – I've been loving that country-esque look lately. But after a LOT of prep and several tries the stain just wouldn't take evenly.

So on to plan B, a different two-tone look that's a little less country, a little more chic.


Black and White Tuxedo Dresser

I'm SO crazy about black and white - the colours are so classic but together they look so bold. 


Love how the new paint job highlights the details. Although in black it does look a little more mustachey..


The new knobs are my favourite part. I had bought the same ones with a white center last year on clearance at Homesense, and while working on this dresser I realized they'd be perfect, but I only had 3. I was disappointed I couldn't use them, but then totally lucked out finding these!


I was surprised at how much I ended up liking this piece - despite using the same old paint. All it needed was a little re-imagining.

Black and White Tuxedo Dresser

In terms of the how-to, I prepped the piece by lightly sanding a few rough spots and gave the whole thing a thorough cleaning. I filled the holes from the old pulls with wood filler and sanded smooth. Then I taped off the sides of the drawers and got to work: 1 coat of Zinsser primer, 2-3 coats of paint, and 3 coats of satin Varathane sealer. 


I added a little paint conditioner to help with brush/roller marks, but I've learned it's really about your technique. Thin coats are better than thick, and the hardest part is trying not to work the paint too much by going over it a million times. Especially with the Varathane, use VERY thin coats and work quickly, or you’ll end up with tons of marks (the can says not to use a roller but I did so anyway), not to mention BUBBLES! I ended up adding a little conditioner to the Varathane too - probably not recommended but I found it helped. In the end I achieved an even surface that's also silky smooth to the touch :) Last but not least I measured out the placement for the knobs and drilled new holes. 


For now this pretty little tuxedo dresser is fancying up my dining room, waiting to get sold!


8 November 2012

Updated Living Room Reveal + Searching For an Area Rug!

The sun was finally shining yesterday, giving me an opportunity to snap a few shots of my updated living room! 


If there's one thing I've learned while blogging this past year it's that my style is constantly evolving. Here's a look back at our first living area in our old apartment.

As I've explored my style a little more I've had fun changing things up. Here's what our living room looks like now!


I found the handmade wool cushions from Kashmir at the CNE - an annual fair in Toronto that includes an international market. I wanted to incorporate more eastern elements into our home and I really liked the colours and patterns in these pillows.

I hesitated a LOT before adding the zebra pillow and other animal patterns in the room, they felt a little too wild for my tastes...but I'd been crushing on animal prints for months so I finally decided to embrace it - in small doses! The pillow and coffee table tray were both from Winners/Homesense.


The hanging lantern was from World Market on our last US visit. The curtains are the same no-sew curtains from our old apartment. Between the chairs, I also added a little brass accordian table from Urban Outfitters.

The tall plant was a serendipitous find :) I went into Home Depot for some poly and stumbled across it hidden in a corner. It looked pretty neglected with lots of brown spots, but it was still love at first sight! It was more than half off and I'm hoping to nurse it back to health, but it had no tag so I don't know what it is - any plant enthusiasts out there have an idea?

See the before and after of my campaign dresser makeover here. I think this is probably my favourite vignette in the whole space :) On the opposite wall is my latest DIY, a gold-leafed etagere IKEA hack. You can also see more about the gallery wall here.


I love that this space reflects more personality now and a bit more of a collected feel. 

It is still a work in progress though, I've already blogged about wanting to change out the coffee table for an ottoman, and I'm also keeping my eye out for a pair of side tables. I'd eventually like to add a different rug, hopefully something a little bigger. Here are a few I'm loving lately:

 1. I'm crazy about this black and gold hemp rug, a bit pricier but here's hoping for a sale!
2. Had my eye on this pretty + graphic navy rug for awhile
3. LOVE this eastern overdyed rug, although it's about 5x my budget..but a girl can dream!
4. This deep oriental rug is a decent price, although on the darker side

It'll definitely be awhile before we're adding anything major though, for now we're just enjoying the new space!

7 November 2012

1 Year of Blogging

source
It’s a little hard to believe I’ve been blogging for an entire year, but this time last year I was putting together my very first post and nervously hitting ‘publish’! Looking back at the past year, I haven’t necessarily posted that often, but even so I feel like blogging has changed my life in so many ways, alhamdulillah :)

I’ve started to rediscover what I’m passionate about and own my talents, and a huge part of that is thanks to the encouragement and sweet words received from many of you! Along with my wonderful family and friends, who always seem to believe in me so much more than I believe in myself. Finding something I truly love to do and being even the smallest bit validated in it gives me this amazing optimism for the future. I don’t know what direction I’ll go yet – whether I’ll build a little business or something else entirely - but I'm excited and inspired and confident in a way I wasn't before this blog (I know that sounds totally cheesy + awkward but it’s true!).


It's been a wonderful year, and I'm so excited to keep decorating and DIYing and sharing every bit of it here!


25 October 2012

Living Room Gallery Wall Install!

 Well, I finally put together my first little gallery wall in our living room! 


I was planning a gallery of travel photos for another spot, but after spending 3 months searching for something large enough to go over our sofa, I finally decided to do one in our living space :)  

Most of these frames had been collected over the past year, a few like the mirror are even older. To figure out the placement I measured the wall space above my sofa and then measured out the same square footage on the floor. Then I played around with a few different arrangements before settling on my favourite.

I thought about doing kraft paper templates to get the spacing right on the wall, but in the end I didn't bother. Using my measuring tape I figured out roughly where the mirror should go and then I referred back to the photo above to figure out the spacing for the rest of the frames.


I still want to do a gallery of our travel photography elsewhere, so I chose a collection of colourful and meaningful prints for this space. The green dome pictured is the Prophet's Mosque in Medina, his blessed resting place and the one place in the world I long to go most (image found on flickr). The little postcard in the top right is from a recent trip along the Pacific coast in Cali, an incredible vacation that my sweet husband surprised me with :)


The floral print as well as the oriental print are actually gift bags! When we visited the US I found these gorgeous printed bags on clearance at World Market and I loved them so much I cut them up and framed them - cheap and easy artwork! The papyrus calligraphy is from Egypt, and the other Arabic calligraphy pieces were DIYed. The lower one was a sticker I found at a local store called The Craft Souk, which I mounted on a plaque with some card stock and gold cord. The top print is our favourite line of poetry which I just typed out on my computer. 


This geometric print was one of my art pieces. I drew the same pattern in blue tones on a card I gave to my hubby on our engagement, but he wouldn't let me frame the original :) The pattern has a special significance for both of us. 

I love this little grouping! I was so tired of the huge blank wall in our living space and now it's come to life with so much colour.


A shot of the new gallery wall with a little peek at our updated living room - I'm waiting for a sunny day to take some pics of the space to share soon :)

22 October 2012

Sprucing a Guest Room with A DIY Upholstered Headboard

Happy Monday! Hope everyone had a great weekend! We had an amazing time with some family visiting from out of town :) Just before their visit, my honey and I helped my parents spruce up their guest space with a few simple updates and a DIY upholstered headboard!  

 This space in their basement got little attention the last few years, it was mostly home to unused furniture from the rest of the house :) Since most of the budget went to new broadloom and new built-ins (more on that soon!), we couldn't spend a lot on furniture and accessories. So we DIYed the headboard - for about $50 in supplies and less than 2 hours of work - and made a huge impact in the space!   

    
Supplies: 
  • OSB wood board cut to size at the shop
  • fabric 
  • foam mattress pad 
  • quilt batting 
  • staple gun 
  • upholstery tacks (nailheads) and a rubber mallet (optional)
We started by measuring out a size for the headboard. For a queen bed, we went with 62" by 35". We chose an OSB board because it was way cheaper than plywood and easier to staple to, and we had it cut to size at the store.


Rather than buying upholstery foam (which can get pricey!) I used a foam mattress pad. The twin size pad worked perfectly. 

 
First I laid the foam on top of the board and cut it to size - about an inch larger than the board so it could wrap around the sides and create smoother rounded edges.  


Next I laid out the layers of the headboard - fabric, batting, foam, and the board. If your fabric has a right side, make sure it's face down, and if it's patterned you'll also want to line it up. You can also glue your foam to the board - we did this with plain old craft glue since we were working indoors, but I realized afterwards it wasn't necessary. 


With my foam overhang around the board it was harder to staple all 3 layers neatly, so I stapled the foam first. I pulled it around the back of the board and stapled, and trimmed some excess from the corners. Then I just pulled the fabric & batting tight and stapled to the back of board. I started in the middle and worked my way around, one side at a time & saving the corners for last.  


To do the corners, I trimmed away some of the extra fabric & batting that was creating too much bulk. Then I just sort of winged it, stapling as close to the corners as I could and using the little flap that remained to create a small pleat. 

  
Next I added a nailhead trim with upholstery tacks. You can use pre-made strips of nailhead trim like these, but I couldn't find the right colour in stores and was too impatient to order online :) In anycase, nailing them individually didn't take long at all, and I ended up loving the spacing! I kept a measuring tape on hand to make sure my line stayed somewhat level, but for the most part I eyeballed it. I also went back and redid a few. The trim isn't totally straight and the spacing isn't quite even, but you can hardly tell. The hardest part was that the tacks kept bending, but after a bit of practice I got better. The key was to start gently tapping until they inserted into the wood, and then nail harder to get them all the way in.

The last step was adding legs. You could attach your headboard to the wall, but we wanted a less permanent set up. So my sweet husband cut 2 legs from the leftover OSB and attached them to the back of the headboard, measuring the right height and making sure they were level!

Between the 2 of us it hardly took us 2 hours, and the final product makes for an inviting and relaxing guest space :) 

This project was so easy, trust me when I say anyone can do it - I can't wait to do another! It adds a subtle sophistication to the space, plus it's soo comfy. 


We dressed the bed using mostly linens we had on hand, although I added a bed skirt to hide the old metal bed frame. Other little updates to the space include the inexpensive Ikea table lamp, new cushions for the wicker chairs, and full length curtains that help to soften the look of the room.


With a couple updates and an easy DIY headboard, my parents' guest space is totally transformed. Lucky for me my husband I will be the next guests checking in - for Eid next weekend :)