26 October 2013

A Nook for Baby

As crazy as it is for me to believe, we're less than a week away from our due date!


I can't remember when exactly my nesting instinct kicked in, but it's definitely in high gear now :) I've been working little by little on the nursery for the last few months, there are still a few details to pull together so I'll share that when I can. In the meantime though baby will be rooming in with us in this cozy little corner :) 

I love love LOVE our bassinet. I fell so hard for it online (at PB), but considering we'd need a crib down the line, the price tag was not happening. Then when I finally considered the splurge, I found out they're no longer sold in Canada - or even shipped here! Weird right? I scoured craigslist for weeks while seriously debating the one by Restoration Hardware (and elaborately rationalizing the price in my crazy pregnant brain :), until I finally found this one on Kijiji - definitely one of those clouds parting angels singing moments! And bonus - it was generously gifted to us by family :) We've left the skirt and bumper off for now, I kind of like it with the bottom exposed? Best part is that we can roll it next to our bed at night for easy access during midnight feedings. 

Can't wait to meet this little bun...and be a mom (I know, right?!)! 

10 October 2013

Sneak Peek - Turkish Tiles

In the mad dash to get ready for baby, we finally got started on our Turkish tile project. Here' a little sneak peek!


Turkish tiles obviously have nothing to do with baby prep, but if we didn't do it now we wouldn't get to it for months..or even years :) We still have to finish the frame and figure out how on earth to hang this thing (it's HEAVY!), but I'm super excited at the progress. Updates soon!

25 September 2013

Basement Bath Reveal!

So it's been like 7 months since I first posted about installing the shower in our basement bath, talk about a drawn out reno! Truth be told all the major work was done back in March, but between being preggers and the fact that we don't really use that bathroom ourselves (it's for the in-laws when they're here, or other guests) we didn't get around to painting and caulking or the other finishing touches until the end of July - as in the day before my MIL was coming to town :) In fact, I was quickly snapping these after shots just as she arrived, while she patiently waited to actually use the bathroom :)


Here's how the room looked before:

Perfectly fine as is, but with only one tub in the house we really wanted to put in a shower, which also meant gutting the floor and ripping apart the walls. The wall to the left was shared with a storage closet, so we cut into that to install the new (huge!) shower.


This is pretty much the most luxurious space in our whole house. I'm so wishing it was our upstairs shower!


I originally picked out a gorgeous marble subway tile and chair rail for the walls, but after a lot of urging from our handyman we kept it simple with these larger travertine tiles and a marble mosaic on the floor - slightly less expensive and a lot less maintenance for a guest bath.


At first I wasn't really feeling just how much the colours varied in the stone, but now I actually really love it. The bench was a nice added feature too - just that small added detail makes the shower feel super-fancy.


We repeated the same travertine tiles in a diagonal on the bathroom floor, and also gave the room a fresh coat of 'chocolate froth' by Behr (which is reading so grey in these terribly lit photos but is actually a warm greige). The pretty new towel rods and paper holder are from Homesense - I love their selection of bath accessories and I find the prices so much more reasonable than big box stores. We did salvage the toilet and vanity because they were pretty much brand new, although I really want to give the vanity a little makeover at some point. Once the vanity's painted out the new mirror (which i love!) hopefully won't look so out of place. 


But it'll likely be a long while before that happens - for now we're calling it done!

2 August 2013

A Mughal-Themed Bridal Shower!

My brother-in-law is getting married to the loveliest girl ever, and a few weeks ago her friends threw her a really fun Mughal-themed bridal shower in our home. The girls were decked out in gorgeous outfits and jewels, the food was delish, and the games were super cute. And naturally, my part in the party planning was a little decorating :)

I used whatever I had on hand (between myself and some stuff borrowed from my Mum) so to be honest I’m not sure how ‘Mughal’ the décor really was, but I think it had an overall eastern-ish vibe.   


The main focal wall was draped with rich fabrics in jewel tones – an old bedspread & curtains, some fabric from my own wedding, and a sari. I added a few accessories and also a little seating area. (There's a peek in the corner at my formerly bald fiddle leaf fig which started sprouting new leaves! But only from one stem - any tips to encourage growth?)


Red & pink tissue poms, my fave go-to décor, added some fun colour around the room.


I didn't have nearly enough seating so we lined the room with tons of cushions and pillows – I found those velvet emerald ones on clearance at Pier one awhile ago and have been hoarding them ever since, I’ll find a spot to use them someday :)  


I forgot to snap any pics of all the fab food the girls brought but these rosette cupcakes were too cute to miss – and they were so good! Don’t ask me how many I ate :)


Now we’re getting ready for a house full of family and a whirlwind of wedding festivities in the coming weeks – I’m SO excited I can hardly wait!

27 July 2013

Babymooning in Istanbul

My husband had some time off last month between finishing school and returning to work, so we took the opportunity to visit one of my all-time favourite cities: Istanbul! 

Sunrise over the Blue Mosque

It was probably one of our last chances to get away just the two of us before baby, so we wanted to make the most of it. We
loved it. It was breathtakingly beautiful and SO much fun and so spiritually uplifting too. 


This was my second time in Istanbul (the first was a mother-daughter trip just before I got married :) and I love everything about the city – the eastern charm & tradition mixed with western comforts, the little cobblestone streets and alleyways, the skyline sprinkled with towering minarets, and most especially the people. Their hospitality was unlike anything I’ve experienced as a tourist before. I can’t count the number of apple teas I was offered (or how many I actually drank :), and more than once we ended up spending hours with people we just asked for directions. Everyone was just so sincerely warm - other than one unfortunate encounter with pickpockets!


By far the best part for us was the spiritual energy of the city. The mosques were incredible, some of the most magnificent I’ve ever seen, but more than that were the prayers and dhikr and recitation of Quran that filled them. There were too many sacred sites & relics for us to possibly visit in one week, but everywhere we did go was packed full of locals and foreigners alike making ziyarah. It was indescribably beautiful :) 

Suleymaniye Mosque

Eyup Sultan Mosque
Blue Mosque interior and courtyard


And of course I found bits of design inspiration everywhere I looked! Between the grand architecture of the mosques and palaces and the gorgeous ceramics and textiles lining the street shops I was in design heaven :) 

 
Our fave little shop in the Grand Bazaar


I indulged my love of blue and white in a few bowls and vases, plus a huge tile set that I can’t wait to put together! My other mini-splurge was a small Turkish kilim – haven’t found a home for it yet but I’m thinking of turning it into a wall hanging.  


It was the perfect mix of spiritual retreat and touristy fun, with a little dusting of romance for good measure :) Not to mention the incredible cuisine – my growing bump fell in complete love with iskander kabob! Here's hoping we can go back again someday soon, with baby!

14 June 2013

summer garden party: easy centrepieces & diy heart garlands

A few weeks ago we threw a little surprise shindig for my parents anniversary - they rarely celebrate in a big way so I really wanted to make it special. But after spending weeks getting our backyard party-ready (laying sod and a new deck - more on that soon!), I didn't have a lot of time (or money!) left for other details. So when it came to decorating, easy and inexpensive ideas were key.  


I picked up some fresh flowers from the grocery the day of the party and threw together these pretty floral arrangements in my fave Dollarama vases. They didn't have a lot of stock that morning so I chose an assortment of whatever was on hand, but I was happy with how they turned out :)


The frayed-edge burlap runners were another quick and easy diy, cut from some jute fabric I found on sale at Fabricland. I thought it was befitting for a garden party :) No sewing necessary (I used this tutorial as a guide) - it took literally less than an hour to make 5.

To top it off, I added a little shimmer to the tables with some candle holders saved from my engagement (which were super cheap from Jordan).

We set up the buffet inside so I wanted to dress up the huge blank wall behind the table. These super sweet heart garlands (inspired via pinterest of course :) did the trick, and they were so simple to make. 

I already had a little heart puncher (bought years ago from walmart for $5), so I just used some red paper and punched out tons of hearts, then strung them together with a needle and thread. It was so mindlessly easy - just watch out for tangles!


I missed out on pics of my 40+ tissue poms, but I did get plenty of the pièce de résistance (which admittedly doesn't look simple or easy) - the amazing cake, handmade by our fabulous and super talented friend Farheen :)


Complete with a recipe for halal fondant - and trust me, it tastes as good as it looks!

We also diy-ed our own canopy to shade our guests rain or shine, at a fraction of the cost of renting a tent.

That tutorial will have to be saved for another post though - partly because I didn't have time to take pics of the process, but mostly because I almost ruined the entire thing by cutting the tarp way too short (so much for remembering the pythagorean theorem!). We'll be redoing this for another party in August so hopefully I can share the deets next time around :)

11 June 2013

Baby News!

Hello again loves! I'm finally back after that long break - which was unintended, but with good reason :) 

source

The honey and I are expecting our first little one! Alhamdulillah, it's been such an exciting and blessed time. But I won't sugar coat it too much, the excitement has come with lots of less-than-fun symptoms - I'm sure many of you can relate! I'm SO indescribably happy and just over the moon thinking about what an enormous blessing this is, but I'm not going to pretend I haven't also been super cranky :)
 

Thankfully I've started feeling a little better as of late so I'm hoping to get back into the swing of things. Stay tuned!


15 March 2013

Updates

Happy Friday everyone - Jummah Mubarak! 

It's been a slow week around here so no big reveal to share just yet, but the basement bathroom is almost finished! 


The shower is complete and the drywall is patched, all it needs is a fresh coat of paint and a little caulk around the trim. Then God-willing we'll be moving on to the kitchenette!

New potlights are going in today in the master closet - exciting stuff! So glad we had this done, it was uber dark in there before. 


Would have loved a pretty chandelier of course, but the potlights made more sense in a closet this size. Plus my parents had these fixtures leftover from their basement reno, so they were free!  

In other news, my beloved fiddle leaf fig tree is on it's last leaf, literally :(  

I had it in a spot with tons of light but it just hasn't adjusted well to the new house. I tried repotting it, talking to it, even reading Quran over it. I'm still hoping and praying it'll come back to life in the spring - any suggestions? 

Back next week with more deets on the bathroom  - enjoy your weekends :) 

1 March 2013

DIY Penny Projects + A Winner!

I've been having so much fun going through all your fabulous DIY penny projects in the Value Village/Savers giveaway - a huge thank you to everyone who entered, as well as those who stopped by!

If you're looking for some penny inspiration or even just some eye candy, here's a look at the entries:


Tanya of Dans le Townhouse designed and created this stunning DIY penny ring from an old penny she found in her change after a trip to Value Village! I love this project so much - it's quick and easy but so so beautiful!


TicQuellia designed another gorgeous penny ring - she created her 'common cents' ring using pennies from years significant to her. What a great way to DIY a personal memento and a fabulous piece of statement jewellery! Follow TicQuellia at @ticquellia-elle. 


Jennifer created another special memento and a family heirloom - a beautiful penny bracelet featuring the year of her wedding and the birth years of herself, her husband, and her children! She attached the coins to a copper chain and the results are just stunning! Can you imagine how gorgeous this would look on?


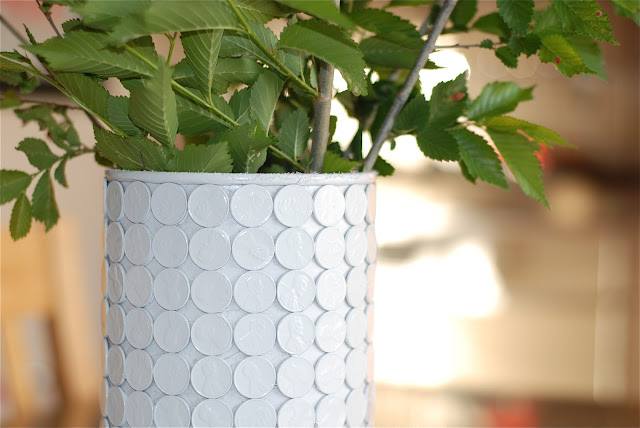
Another easy DIY with gorgeous results comes from Jamie of Kreyv! She created this pretty penny vase using an oatmeal container and $2.50 in pennies. A couple coats of spray paint later and she had this cute textured vase!


This is the perfect idea if you love the shape and texture of pennies but aren't a huge fan of copper. I think it would be so cute as a piggy bank too! 

To put your pennies to work in your home decor, Crystal submitted her simple but ingenious idea to use pennies as curtain weights! She picked up some curtains at Value Village and sewed pennies into the hem every 6 inches - what a handy tip!

Another home decor project, Jennifer of Knit Wit on the Prairies DIYed this amazing penny tiled table just before saying goodbye to the Canadian for good. She used an old end table she had on hand and a piggy bank full of pennies to create her beautiful mosaic table top, and Jennifer's table has special significance too - she added a little cluster of pennies featuring the birth years of her family! 


Shannon's husband of C, Me & E loved the look of copper so much they decided to create this gorgeous penny tiled alcove wall. She wasn't originally a fan of the idea but I bet she loves it now! It took them about 4 days (and what I'm guessing was a ton of patience!) to attach each penny to their wall alcove using liquid nails. They used about $42 worth of pennies - not a bad investment for a showstopper of a wall! 


And finally we have an extreme DIY that is definitely not for the faint of heart! Ellen and her husband from The Sustainability Adventure built the eco-home of their dreams and recently added this incredible 16ft penny-tiled accent wall that is sure to blow you away! 


They used almost $200 in pennies and spent months making mesh penny tiles, tiling, grouting, and cleaning the grout. It looks like a TON of work (and forget about the work, I doubt that I could handle such a tall ladder!) but the results are SO worth it!

To see where my love for penny tile began, check out this penny tile inspiration post, and my own penny tiled mirror!

Now for the winner of the giveaway - there was no way I could pick my favourite from all these amazing projects, so we drew for it randomly. Congratulations to Shannon of C, M & E! I'll be in touch soon!

Finally a HUGE thank you goes out to Value Village/Savers for sponsoring this fun contest! I have to say I secretly wished more than once that I could enter myself :) I love that Value Village promotes recycling and reusing, and supports local communities, not to mention it's one of my fave places to go thrifting. My husband even used to hang out there with his friends as a teen - apparently it was the cool place to be in Sydney River :)   

P.S. I wasn't paid or perked to host this giveaway - I really do just love Value Village!

25 February 2013

Last Day to Enter Your Penny Projects in the Value VIllage/Savers Giveaway!

Happy Monday everyone!

Just popping in to let you know that today is the last day to submit your penny projects to enter the Value Village/Savers giveaway!


It can be anything - big or small - so there's still some time left to put something together :) We've received a bunch of amazing entries so far - all of which will be featured later this week!

Enter here or via email at samaakhan[at]gmail[dot]com. 

22 February 2013

Linen Closet Makeover

Hey guys - Happy Friday + Jummah Mubarak! On a side note -  there are 3 days left to enter your penny projects for a chance to win $150 giftcard at Value Village/Savers! 

So confession time - the unsettled-ness of the new house is driving me nuts! We've been here 2 months and there is still a ton left to unpack. You know that feeling where everything is disorganized and you don't know where to start? Yeah, that's been me for the last 6 weeks or so. In all fairness it's partly because there's nowhere to really put things away - we have a lot of space but not so much storage. But the fact that I'm a master procrastinator isn't helping matters either. I am SO ready to be rid of all the clutter.

So naturally I was really excited to finally check some storage off our to-do list last weekend: the linen closet. It's a small start, but it's a start!


When we moved in the closet was in pretty sad shape - gross yellowed paint and no shelving. You could see the patches where the previous owner had fixed up the drywall, presumably from ripping out the old shelves (which I'm guessing, from the state of the other closets, were pretty gross too). 


Since there were no shelves I just piled a bunch of stuff in there, and for weeks I avoided opening the door in case everything fell out on me in an avalanche of bags :) So last weekend we finally got around to making it functional.

I thought about wire shelving vs solid shelves, and although wire shelves are airier, I'm just personally not a fan of the lines they create on fabrics - plus the solid shelves actually worked out cheaper. 

We started with a quick paint job to freshen things up - a gorgeous blue grey called 'Light French Grey' by Behr. Then we got to work on the shelving - the hubs picked up 3 8ft-long 1x3s and cut them to size for new supports. I measured out the spacing for the shelves and then we attached the supports to the studs (pre-drilling the holes and then securing them with screws), checking that everything was somewhat level along the way.

I wanted the supports to look really neat so we also made sure the screws were sunken in a little, then I spackled all the holes. I also caulked the corners where the supports met up for a more seamless look. 


Finally I gave the wood a light sanding and then painted out the supports to match the walls.
  
You can still see them a little but they blend in to the walls pretty well. After that we just placed the shelves on top - we had them pre-cut at Home Depot from 8 ft pieces of laminate shelving that they carry in the lumber section.


It turns out I made the top shelf a little too high - there's a ton of room up to the ceiling but the opening to the shelf isn't tall enough to put anything really big up there, but luckily there's enough room that I can still pile things up. I've already started putting a few things away.


This isn't everything that will be going in the closet so it's very misleading - it won't be quite this sparse for long :) But I LOVE when things are neat and organized so you can only imagine how I'm swooning over this linen closet :) I already had the iron holder, so all in all the supplies only cost us around $25 - not bad right? I can't wait to tackle some of the other closets!